Lets talk about Harnesses
Share
Have had this written for a while and just haven’t posted it this is a more in-depth look at Harnesses following on from our previous blog = 5 Things you need to know about Harnesses ..
In this Blog were going to cover more around the instillation of a harness and what’s changed with the new FIA 8853/16 Harness Homologation
FIA 8853/16 Changes came in December 31st 2017 .
Why the change? Recent international accident racing data showed that drivers were now surviving 70g + crashes. This is mostly due to modern vehicles improved cockpit interiors, new safety regulations i.e. improved cages and innovative materials are all contributing factors to these statistics. Consequently the FIA realised it was time their harness homologation tested for the forces and energies generated during such 70g accidents. The major changes are significantly increased sled/crash testing dynamics. For example, the impact speed was increased from 50+/- to 67 +/- 1kN/h. The peak change in velocity will be increased from 32g to 60+g. The breaking load for straps/webbing (sub-straps) increased from 11.3kN to 25kN.
Notable other changes - Not accepted or qualify for homologation under 8853-2016: 5pt harnesses: V-Strap harness systems (sub-strap with single merge point connection to buckle.) Drivers using Head & Neck Devices to use a 44mm (2") width shoulder strap with no 2" to 3" strap conversion. Such harnesses will have a label designating them as H&N harnesses. Double shoulder H&N strap harness are also now homologated under this standard.
Buckle strength tests have increased and marking on the buckle making it easier to find in stressed condition.
Under CAMS for National completion and under a FIA harness can be extended 5 years past the use by date on the harnesses meaning you can get up to ten years life out of a harness provided you keep them clean, well maintained and they aren’t damaged. A SFI certified harness still holds a have a 2year validity, after this they must be returned to the manufacturer for webbing/certification.
Installation – As a scrutineer Harness instillation is one area I see a lot mistakes and not just from novices but professionals – Harnesses just seem to be the last thing that’s set up despite being one of the most important parts of the car. Please spend the time to set up your harness correctly.
Mounting/ Anchorage points are required below the hips and behind the shoulders. If a crutch strap is to be used, the anchorage points need to be below and behind the crutch.
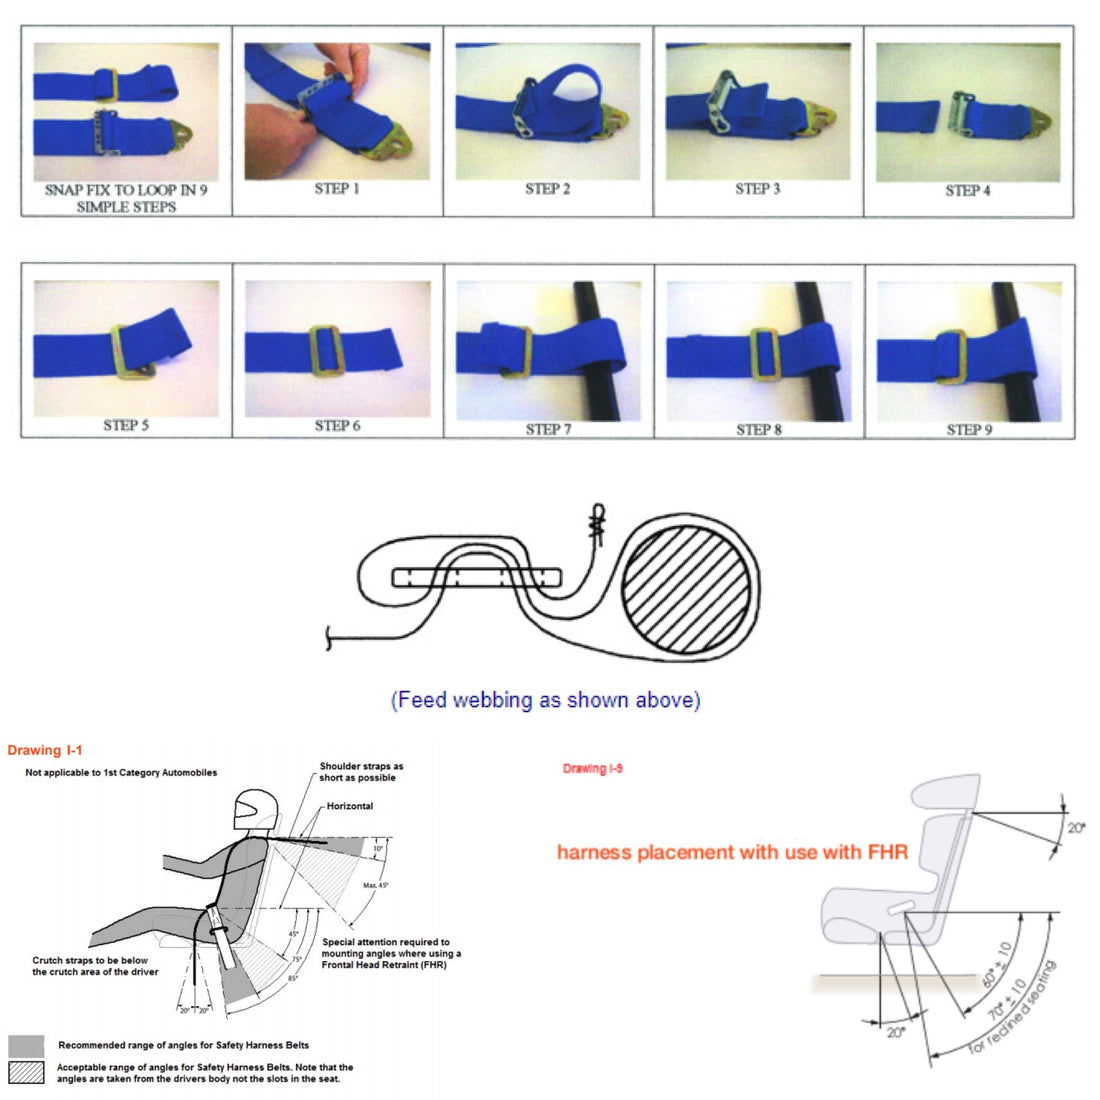
Refer Drawing I-1 – CAMS Manual Schedule I for the right angles. Basically 20% is optimal.
If suitable anchorage points with 7/16” U.N.F. threads (international standard for seat belt points) are already provided, these should be used in preference to fabricating new points. If a new point is needed the again refer cams schedule L – we offer easy of the shelf reinforcing plates. These can make life easy for the tunnel side or crotch belt by simply drilling a hole in the floor and running the eyelet through to the backing reinforcing plate.
As a note Lap and shoulder anchorage points should be capable of withstanding loads of 3500 lbs (1590kg).
Straps should run directly from the lap or centre of shoulder to their anchorage point with no obstruction or deviation. Straps must not be twisted.
Manufacturer’s rear seat belt lap anchorages (found below rear seat cushions) may be used if they satisfy the requirements i.e. they allow the harness to be at the right angle and have the right spread.
The lap straps should hold the lap region over the greatest possible surface area. They should terminate downwards and rearwards of the hip joint - between 45° and 85° of the horizontal - and be positioned symmetrically about the wearer on either side of the seat.
LAP STRAPS SHOULD NOT BE WORN OVER THE ABDOMEN. – If they are you have them too high, also note the adjuster buckles on your shoulder straps should be about your nipple line and if you are wearing a HANS within 70mm of the base of the HANS.
HANS – additional to the above if you are planning to run a HANS (everyone should) or are mandated to in your class you need to abide to slightly different Harness mounting requirements the key thing is the angle of the shoulder straps is reduced and a defined measurement for the spread of rear straps based on collar size.
This is one thing I see incorrect often – if you run your shoulder straps rearward to a harness bar in the back stays or the parcel shelf your straps are probably over 500mm long meaning there is a negative spread – what this means you have to cross your straps and have the right gap between them. Refer drawing I-9 and Table I-3 in the CAMS manual Schedule I
Another thing we routinely see wrong is the adjustment of straps ends or the way they are wrapped around harness bars, this is critical to ensure there is no slippage in an accident. To correctly do this follow these steps
Step 1:
Tilt adjuster & push lock bar to back of slot.
Steps 2-4:
Holding lock bar back, feed webbing tail through adjuster to release snap hook end.
Steps 5-6:
Feed webbing, with sewn edge down, through both slots of the 2-slot bracket provided.
Steps 7-8:
Create loop around roll cage/bar & thread webbing back through both slots of the 2-slot bracket.
Steps 9:
Finally, turn webbing tail back on itself & feed through the one slot nearest the roll cage/bar to lock off. (Feed webbing as shown in pic).
Like our previous blog = 5 Things you need to know about Harnesses .. This is really brief and there is a lot more to Harnesses so please don’t hesitate to ask if you have any questions what so ever, we will be doing a video soon showing mounting of a Hans Harness in our new Excel Cup Car so keep tuned for that.
Special thanks to @Tahlia for keeping on us to get this out.